Palm vein lock is a creative smart lock due to more apartment buildings and modern residences adopt advanced access systems, many people naturally ask: Is a
palm vein lock truly safe, and is it reliable enough to serve as an apartment smart lock?
Chapter 1: What Makes a Palm Vein Lock Safe Compared to Other Smart Locks?
How Palm Vein Recognition Works
A palm vein lock uses near-infrared technology to scan the unique vein patterns inside your palm. Unlike fingerprints, which can be lifted or partially copied, palm vein patterns lie beneath the skin and cannot be duplicated through photos, residue, or surface contact. This internal biological signature makes palm vein authentication one of the most secure biometric methods in the world.
Why Internal Biometrics Are Harder to Fake
Traditional biometric methods like fingerprint or facial recognition rely on external features. These can be affected by dirt, lighting, temperature, or even partial damage to the skin. A palm vein lock, however, reads internal blood vessel patterns, which remain stable and hidden. Even identical twins have completely different palm vein structures.
Accuracy and False-Rejection Improvements
Because palm vein scanning requires blood flow, it naturally prevents spoofing attempts. It also reduces false positives because the pattern is extremely complex. Modern systems—such as those used in Filta's advanced palm-vein security series—deliver high accuracy even if the hand is slightly rotated or not perfectly aligned.
Comparison with Other Biometric Technologies
Fingerprint: Can be worn down, affected by moisture, or lifted by residue.
Face recognition: Light sensitive and more vulnerable to high-resolution image attacks.
Iris scanning: Accurate but sometimes slow or uncomfortable.
Palm vein lock: Quick, contactless, internal-pattern based, and extremely difficult to imitate.
Filta's Secure Palm Vein Solutions
Filta's palm vein lock products combine biometric precision with strong encryption, creating a multi-layered security system designed for apartments, offices, and private residences. Their technology prioritizes fast recognition and stable performance even in low light environments.
Chapter 2: Why Should Apartments Consider a Palm Vein Lock as a Smart Lock Solution?
Enhanced Access Control for Residential Buildings
Modern apartments need more than simple keys or pin codes. An apartment smart lock using palm vein recognition provides accurate, controlled, and trackable access without any need for physical keys. It reduces lost-key problems and unauthorized duplication.
Better Protection Against Unauthorized Visitors
Traditional keys can be borrowed, copied, or stolen. PIN codes can be leaked. Cards can be shared. But a palm vein lock cannot be bypassed using shared credentials because each person's vein pattern is unique and non-transferable. This makes it highly valuable in apartments that prioritize secure tenant access.
Improved User Experience for Tenants
People prefer convenience in daily access. Palm vein technology requires no contact, no phone, no code, and no physical object. Simply hold your hand above the scanner and the door unlocks. For an apartment smart lock, this touchless interaction offers a premium, modern living experience.
Applicable to Shared Entrances and Private Units
Palm vein locks can be installed:
on main lobby entrances
on shared access points, such as gyms or elevators
on individual doors using a smart lock for apartment door configuration
Filta's palm-vein smart lock series is engineered to fit most modern apartment doors, supporting both single-unit and multi-unit security systems.
Reduced Maintenance and Better Hygiene
Because palm vein systems are completely contact-free, they reduce surface contamination and wear. For apartments with hundreds of tenants, this offers a significant advantage compared to keypad smart locks that wear out after repeated touching.
Chapter 3: How Does a Palm Vein Lock Improve Daily Convenience and Security?
Touchless Unlocking for Clean and Efficient Entry
The biggest convenience factor is the completely touch-free authentication process. This reduces hygiene concerns and supports faster entry, especially when carrying groceries, bags, or children. It's a major improvement over physical keys, fingerprint pads, and PIN keypads.
Multi Method Unlocking for Practical Use
While palm vein technology is the highlight, Filta enhances safety by offering multiple unlocking methods within their systems:
Palm vein scanning
Password entry
NFC card
Mobile app control
Temporary access codes
This flexible security structure makes the lock practical for tenants, guests, and property managers.
Better Security During Emergencies
In situations such as evacuations or sudden tenant access changes, palm vein locks enable administrators to update permissions instantly via a central system. This is particularly useful for property managers who need quick control capabilities.
Stable Operation in Different Lighting Conditions
Palm vein scanning does not rely on visible light. It works effectively in bright sunlight, shade, or complete darkness. For a smart lock for apartment door, this is a major advantage because residents often enter during nighttime or in dim hallways.
Integration With Smart Home Ecosystems
Many apartments now integrate IoT systems. Filta's palm vein lock models support advanced connectivity options that allow:
remote unlocking
access monitoring
cloud management
integration with building access control systems
This makes the lock not only a security device but a connected digital access platform.
Durable Build and Anti Tamper Structure
High grade metals, reinforced lock bodies, and advanced anti-pry mechanisms ensure that the lock remains physically secure. Even if the external surface is damaged, the internal module protects stored biometric data through encryption.
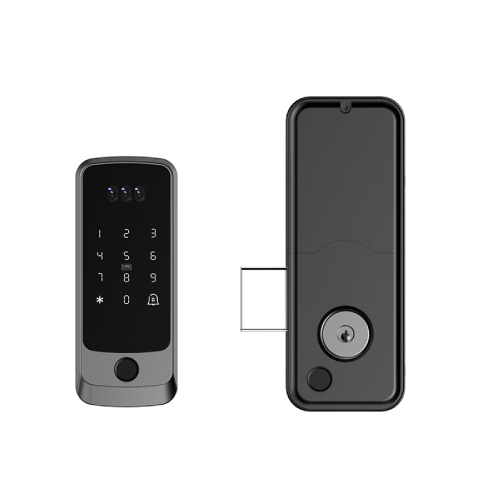
Chapter 4: Why Filta's Palm Vein Lock Is a Reliable Smart Lock for Apartment Doors?
Advanced Biometric Recognition Engine
Filta's palm-vein algorithm is designed for high accuracy, fast response times, and reliable scanning regardless of hand temperature or slight movement. This engineering precision ensures consistent performance for large residential communities.
High Encryption and Privacy Protection
The biometric data stored in Filta products is encrypted and converted into digital templates. It cannot be reversed into a real image or biological structure. This is essential for tenants concerned about biometric privacy.
Strong Hardware and Modern Aesthetic Design
Filta's palm vein locks combine:
durable metal frames
smooth exterior finishes
modern panel shapes
ergonomic scanning surfaces
For property developers and apartment managers, the combination of design and functionality provides a premium upgrade for modern buildings.
Easy Installation for Most Apartment Doors
Every Filta smart lock for apartment door is designed for quick replacement of traditional locks. The structure supports common installation standards used in apartments worldwide.
Stable Software and App Control
Filta products provide mobile-based control, allowing administrators to add or remove users, manage permissions, and track access logs. This is valuable for rental apartments, shared housing, or short stay properties.
Reduced Long Term Cost for Property Owners
Compared with fingerprint locks or keypad-based systems that degrade from repeated touching, palm vein locks offer longer lifespan and lower repair frequency. The sensor does not physically contact users, preventing surface wear.
Certification and Quality Standards
Filta smart locks follow strict manufacturing protocols and international security standards. Their palm vein lock products reflect a blend of advanced biometric technology and reliable mechanical craftsmanship.
FAQ
Is a palm vein lock safer than fingerprint locks?
Yes. Fingerprints can be damaged or copied, while palm vein patterns are internal and nearly impossible to replicate.
Can a palm vein lock be used on apartment doors?
Absolutely. Palm vein systems work perfectly as an apartment smart lock, offering secure, touchless access.
Is the technology affected by lighting conditions?
No. Palm vein scanning uses near-infrared light and works in both bright and dark environments.
What happens if my hand is dirty or slightly wet?
Unlike fingerprint sensors, palm vein scanning reads internal vein patterns, so surface dirt usually does not affect recognition.
Is it suitable as a smart lock for apartment door systems?
Yes. Filta designs its palm vein locks specifically for modern apartments, integrating both convenience and strong security.
Can guests or temporary visitors use the lock?
Yes. Temporary codes, NFC cards, and app control make access flexible and manageable.
Does Filta protect user biometric data?
Yes. Filta encrypts all biometric templates, ensuring that actual vein images cannot be recovered or shared.