Maintaining order in the entryway can be a challenging task. As the initial impression for guests, this space frequently becomes disarrayed with outerwear, shoes, mail, and other items. Introducing a modern coat hook serves as an excellent solution to effectively organize and declutter your entryway, regardless of the available space – be it ample or limited.
Modern coat hooks are designed with a functional purpose, prioritizing utility over mere decoration. As such, they must possess the capability to accommodate an ample number of coats and exhibit sturdiness to bear the weight effectively.
In terms of aesthetics, experts recommend certain considerations when selecting a coat rack that complements your space. It's essential to ensure that the materials harmonize with those used elsewhere in the room. For instance, opt for timber that aligns with the floor color or choose a more vibrant option for a children's area.
Additionally, think about the versatility of the coat rack. While its primary function is to store jackets, it can also serve as a practical spot for other items. Beyond holding your essential purse, coat, and hat, a robust and securely mounted coat rack can be used to organize backpacks and dog leashes near frequently used entrances. In bedrooms and closets, these racks can efficiently organize collections of purses, belts, or hats.
Determining the ideal height for hanging a coat rack may seem subjective, but there's no strict rule to follow. While personal height is a consideration, a general recommendation falls around 5 feet. However, personal preferences come into play; if you are on the taller side and the sole user, positioning it higher might be suitable. Conversely, if you want children to access it easily, consider a lower placement. Some experts also suggest taking into account the length of your longest coat, like a trench coat, to prevent it from dragging on the floor.
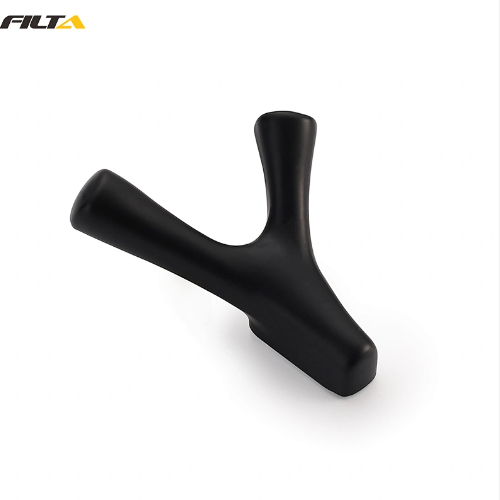
Branch Wall Hook
Branch wall hooks can be made of various materials, including metal, wood, or a combination of both. Consider the overall style of your space and choose a material that complements your decor. Metal hooks may provide a sleek and modern look, while wooden hooks can add warmth and a natural touch. There is a black coat hook in Filta, if you have some interests, you can contact us as soon as possible.
Freestanding Coat Rack
Featuring three tiers of hooks, this standalone coat rack provides ample storage for a variety of items, including rain jackets, winter coats, scarves, purses, and more. Its lightweight design allows for easy mobility throughout your home. Moreover, its minimalistic aesthetic seamlessly integrates with your existing decor. Ensure a balanced distribution of weight on the coat rack to prevent any tilting or tipping caused by an uneven load on one side.
Wall Mounted Coat Rack
Maximize the untapped potential of your entryway walls with this straightforward coat rack designed for efficient storage. Crafted from heavy duty steel, the wall mounted rack boasts a substantial backplate, ensuring stability even with the weight of numerous jackets and backpacks. Endorsed by Hord, it offers a range of sizes, accommodating from two to 10 hooks, allowing you to tailor it to your available space. Its versatile application extends beyond the entryway – hang it in your closet for belts and necklaces or in the bathroom for extra bath towels and robes.
Coat Rack With Shelves
Organize your jackets and elevate your shoe storage game with a coat rack featuring a convenient built in storage bench. Equipped with two shelves, it can neatly accommodate up to eight pairs of shoes. The added advantage lies in its dual functionality – not only does it provide a space saving storage solution, but the bench also serves as a comfortable seat for the ease of putting on or taking off your shoes. In case the shelves accumulate dirt from muddy footwear over time, a simple wipe with a damp cloth and mild cleaner will keep them looking pristine.
Modern Coat Rack
Featuring carbon steel hooks and a sleek marble base, this coat rack exudes a minimalistic and elegant aesthetic, perfectly complementing modern spaces. Each arm is equipped with an anti drop hook, ensuring that hangers stay securely in place. Additionally, you have the option to hang coats and bags directly on the rack for added convenience. The anti rust coating makes it versatile enough to withstand bathroom environments. With its adaptable yet contemporary design, this coat rack not only enhances the ambiance of a home but also adds a touch of sophistication to office spaces or the entrance of a store.
Leading Ladder Coat Rack
Opt for a distinctive approach to display your coats and accessories by incorporating a leaning ladder into your space. This particular ladder boasts six bars for gracefully draping items, and for a more conventional look, you can employ S hooks to hang coats and bags. Not only does it contribute to a clutter free environment, but it also makes a stylish and unique statement. The top and bottom sections of the ladder are thoughtfully padded with silicone to prevent any movement and protect the floor and wall from marks. Its versatility extends beyond the entryway – consider placing it in the kitchen for hanging linens or in the bedroom for storing throw blankets, cardigans, and accessories.
Coat Rack For Small Spaces
If you find yourself residing in a compact apartment akin to a shoebox, this coat hanger proves to be an excellent choice, ensuring minimal use of valuable floor space. Crafted with versatility in mind, it accommodates various items such as hats, umbrellas, and keys. Its vertical hanging design, available with either six or nine hooks, caters to the spatial constraints of small entryways. For those with sizable families or frequent entertainers dealing with limited entry space, the option to install multiple racks side by side provides a practical solution.
Wooden Coat Rack
Crafted from acacia wood, this coat rack brings an immediate sense of warmth to any space and makes a bold statement in your home's entryway. With its four substantial wooden hooks, it effortlessly supports even the weightiest coats. Additionally, four attached knobs offer convenient storage for smaller items like wristlets or keys. The elegant golden aluminum accents add a touch of sophistication to its classic appearance. Completing its functionality, a circular shelf situated near the bottom provides an ideal spot for placing a pair of shoes, ensuring both practicality and style in your entryway.
Accordion Coat Rack
My preferred choice is this accordion style coat rack, currently in use in my own home. Not only does it effectively accommodate my substantial winter coats, but it also adeptly holds my running gear, including my fanny pack and seasonal hats. Its adjustable design allows it to stretch across the wall according to the available space. Despite its relatively compact size compared to other coat racks, the presence of 10 sturdy hooks ensures ample storage capacity for various items.
Sleek Coat Rack
If you desire a coat rack with a minimalist profile, this sleek wall mounted option is designed to meet your expectations seamlessly. The hooks remain concealed until required, eliminating unnecessary bulkiness when not in use. Upon arriving home and needing to hang your jacket, a gentle pull reveals the hooks for your coat and bag. The mounts are available in six different colors, ranging from natural wood to an all black finish, offering a variety of options to suit your aesthetic preferences.
Heavy Duty Coat Rack
If you find yourself with a collection of heavy coats seeking a sturdy home, this industrial rack is the ideal solution. Constructed with durable iron and featuring a solid base, it ensures stability even under the weight of multiple garments. If mobility is a consideration, there is also a wheeled version available for easy relocation. This robust clothing rack is particularly well suited for spaces like basements and mudrooms where a reliable and mobile storage solution is essential.
We have a fantastic selection of decorative wall hooks that cater to various entry systems. If you’re ready to embrace the advantages of using individual coat hooks, check out Filta for a world of possibilities.


 https://bsptools.com/wp-content/uploads/2024/03/图片1-1-350x197.png 350w,
  https://bsptools.com/wp-content/uploads/2024/03/图片2-1-350x233.png 350w,


