Introduction
Covering a wound properly is essential not only to protect the injured area but also to facilitate healing, minimize pain, and prevent complications such as infections or scarring. One of the most common problems in wound care is dressing adhesion, where bandages or dressings stick to the wound itself. This can lead to significant discomfort during dressing changes and, more importantly, may damage healing tissue. Fortunately, modern wound care has evolved significantly, introducing advanced materials and devices such as the wound edge protector to help prevent these complications. This article delves into how to effectively cover wounds without causing sticking, with a strong focus on the importance and use of wound edge protectors.
What Happens When Dressings Stick to a Wound?
When a dressing sticks to a wound, it creates a host of problems. Adhesion can occur due to the dressing absorbing wound exudate, blood, or other fluids, drying out, and then bonding with the delicate tissues in the wound bed. Upon removal, this can:
· Tear off newly formed tissue
· Cause bleeding
· Increase the risk of infection
· Prolong the healing process
· Result in greater pain and psychological stress for the patient
These outcomes are not only detrimental to the healing process but also increase healthcare costs and resource use due to prolonged treatment durations.
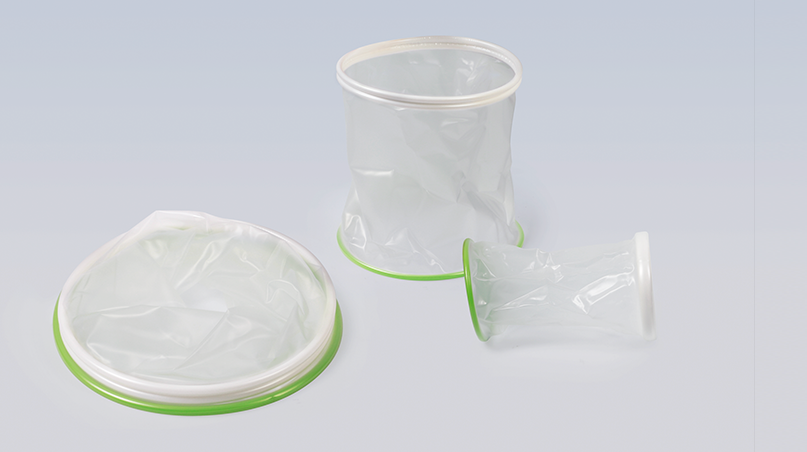
A wound edge protector is a medical device used primarily during surgical procedures to protect the edges of a wound from contamination and trauma. In both clinical and home care settings, it can also serve as a physical barrier to prevent dressings from adhering directly to the wound edge. Wound edge protectors can be made of flexible, biocompatible materials and are designed to fit various wound sizes and types.
Key functions of a wound edge protector include:
· Maintaining the integrity of the wound edge
· Preventing external contaminants from entering the wound
· Facilitating a sterile environment during surgical or post-operative care
· Minimizing mechanical trauma during dressing application and removal
Why Do Wound Dressings Stick?
Understanding why dressings stick is fundamental to preventing it. The following are common reasons:
1. Inappropriate Dressing Type
Traditional dressings like cotton gauze can easily absorb fluids and dry out, sticking to the wound. Non-adherent dressings or dressings with a silicone interface are designed to prevent this.
2. Insufficient Moisture
A moist wound environment is crucial for healing. When wounds dry out, dressings are more likely to adhere. Moisture-retaining dressings like hydrogels or hydrocolloids help maintain the ideal balance.
3. Lack of Wound Edge Protection
Without a wound edge protector, dressing removal can inadvertently damage the skin at the edge of the wound, causing further trauma.
4. Improper Dressing Technique
Incorrect dressing application, including overtight wrapping or inadequate padding, can cause pressure and sticking.
Preparing the Wound for Coverage
To prevent sticking and promote healing, follow these essential preparation steps:
1. Clean the Wound
Use sterile saline or prescribed antiseptic solutions to cleanse the wound gently. Avoid harsh chemicals like hydrogen peroxide unless directed by a healthcare provider.
2. Dry the Surrounding Skin
Blot the skin around the wound dry with sterile gauze to help dressing adhesives stick to healthy skin rather than the wound bed.
3. Apply a Moisture Barrier
Ointments such as petroleum jelly or specially formulated wound gels can create a protective layer that prevents sticking and keeps the wound moist.
4. Position the Wound Edge Protector
If available, place a wound edge protector around the wound to isolate the edge and prevent adhesion during dressing placement.
Choosing the Right Dressing Materials
Selecting the correct type of dressing is critical in preventing wound adhesion. Here are common types:
Non-Adherent Dressings
These are designed not to stick to wounds and include materials like Telfa pads or Adaptic.
Silicone Dressings
These dressings use a soft silicone layer that gently adheres to surrounding skin but not to the wound bed. They are especially helpful for sensitive skin or frequent dressing changes.
Hydrogel Dressings
Hydrogels maintain a moist environment and are ideal for dry or necrotic wounds.
Hydrocolloid Dressings
These form a gel upon contact with wound exudate and are excellent for maintaining moisture while preventing sticking.
Foam Dressings
Foam offers high absorbency and cushioning. Some foams come with a silicone contact layer, combining comfort with non-adherence.
Film Dressings
Thin, transparent, and breathable, film dressings are good for low-exudate wounds but may require caution to avoid sticking in dry conditions.
In surgical settings, a wound edge protector plays a vital role in infection control and tissue protection. These devices are often tubular or ring-shaped and are inserted into the incision area to:
· Keep the surgical site open and accessible
· Protect the wound margins from instruments and gloves
· Reduce the risk of contamination
· Lower surgical site infection (SSI) rates significantly
Studies have shown that the use of wound edge protectors in abdominal surgeries, especially colorectal procedures, can reduce the SSI rate by up to 50%.
Home Use of Wound Edge Protectors
While traditionally used in operating rooms, wound edge protectors are becoming more accessible for home wound care. Chronic wound patients or caregivers may use them when managing:
· Diabetic foot ulcers
· Pressure sores
· Surgical wounds post-discharge
· Burns or trauma wounds
When using a wound edge protector at home:
· Ensure it is sterile and single-use unless otherwise directed
· Follow instructions for placement and removal
· Combine with the appropriate dressing type
Removing Dressings Safely
When it comes time to change or remove a dressing, doing it properly is essential:
· Moisten the dressing with sterile saline if it's dry or stuck
· Gently lift the dressing from the edge, working slowly
· If resistance is felt, re-moisten and wait
· Avoid tearing or pulling forcefully
· Use a wound edge protector to shield healing tissues from damage during removal
Maintaining Wound Hygiene
Good hygiene practices are key to preventing infections and complications:
· Clean the wound daily or as advised
· Do not touch the wound or dressing with unwashed hands
· Replace dressings at the intervals recommended by a healthcare professional
· Avoid tight clothing or friction against the wound
When to Consult a Professional
Seek medical attention if the wound shows any of the following:
· Persistent or increasing pain
· Redness or swelling beyond the wound edges
· Unusual discharge or odor
· Bleeding that does not stop
· Fever or chills
Do not attempt advanced care, including the use of wound edge protectors, without guidance if unsure.
Medical technology has brought several innovations in wound edge protector design:
· Dual-ring designs for secure placement
· Transparent materials for better visibility during procedures
· Antibacterial coatings to reduce infection risks
· Ergonomic shapes for patient comfort and better adaptation to body contours
These improvements enhance not only safety and hygiene but also make the devices easier to use in various settings.
Professional Recommendations for Wound Edge Protector Use
Wound edge protectors are widely recommended in clinical protocols for:
· General and colorectal surgeries
· Obstetric and gynecological procedures
· Thoracic and urologic surgeries
· Post-operative wound care
Products from globally recognized companies such as Kangji Medical are widely trusted by surgical teams for their precision design, biocompatibility, and quality assurance.
Common Myths About Wound Dressing and Protection
Let’s clarify some common misconceptions:
· Myth: "Letting the wound dry out helps it heal faster."
Fact: Moist environments promote faster and less painful healing.
· Myth: "All dressings prevent sticking."
Fact: Only specific non-adherent or silicone dressings are designed for that purpose.
· Myth: "Wound edge protectors are only for hospitals."
Fact: They are increasingly used in advanced home wound care settings.
Summary: Best Practices for Non-Stick Wound Dressing
· Clean the wound thoroughly before applying any dressing
· Use non-adherent, silicone-based, or hydrocolloid dressings for best results
· Apply a wound edge protector for extra protection and to maintain the wound edge
· Avoid using cotton gauze on dry or healing wounds
· Always consult a professional for complex wounds or if unsure about dressing choice
Final Thoughts
Proper wound dressing is a critical aspect of recovery, whether post-surgery or after a minor injury. The goal is to protect the wound, promote healing, and minimize complications. A wound edge protector adds a layer of safety by shielding the wound edges, making dressing changes less traumatic, and improving healing outcomes. By integrating modern tools and evidence-based practices into wound care routines, both patients and healthcare providers can significantly enhance recovery experiences.
Whether in a hospital setting or at home, the use of wound edge protectors represents a significant advancement in wound management. As technology and awareness improve, these tools will become a standard in both professional and personal care environments.