The solar power setup includes a solar cell, a solar charge controller, and a storage battery (pack). If you want the system to produce 220V or 110V AC power, you'll need to add a solar inverter. The solar charge controller manages how the battery charges and discharges. It also regulates the power output from the solar cell and battery to the load, based on the load's power needs. This controller is the key component of the entire photovoltaic power system.
The most common solar charge controllers on the market are PWM (Pulse Width Modulation) and MPPT (Maximum Power Point Tracking) controllers. The PWM controller uses a control method that addresses battery dissatisfaction, achieving a charging efficiency of 75-80%. However, it doesn't fully utilize the solar panel. On the other hand, the MPPT controller is an upgraded version of the PWM controller. It can detect the voltage and current of solar panels in real time, continually tracking the maximum power. This ensures that the system always charges the battery at its maximum power potential. The MPPT tracking efficiency is as high as 99%, leading to an overall power generation efficiency of 97% for the entire PV system.
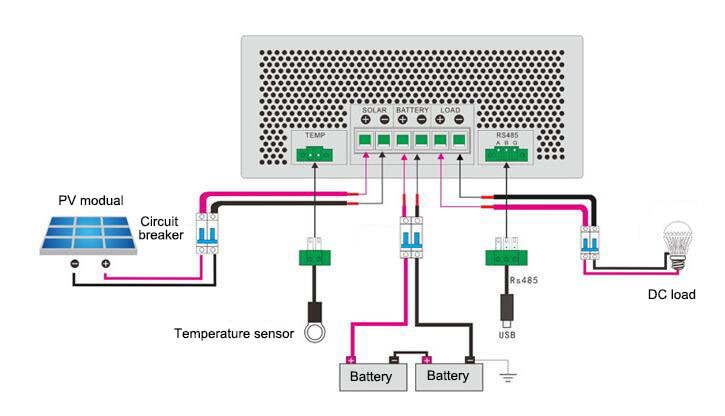
Here is a basic wiring diagram of the MPPT solar charge controller. After that, we will show you how to connect the controller to a solar panel, battery, and DC load step by step.
1. Before connection
The first step that you need to do before wiring is to remove the cover and loosen the connection lock. Once that is done, you will be able to see the wiring terminals for the solar panel, battery, load, and temperature sensor along with a Rs-485 port for the computer.
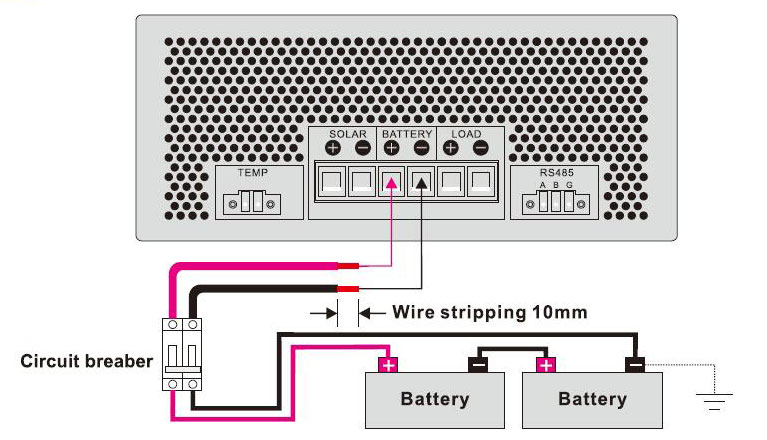
2. Connect batteries to MPPT charge controller
The connection between the charge controller and the batteries is shown in the wiring diagram below. Ensure that both the positive and negative terminals of the charge controller and the batteries are properly connected. The batteries are connected in series. Please note that when connecting the batteries, the circuit breaker needs to be disconnected.
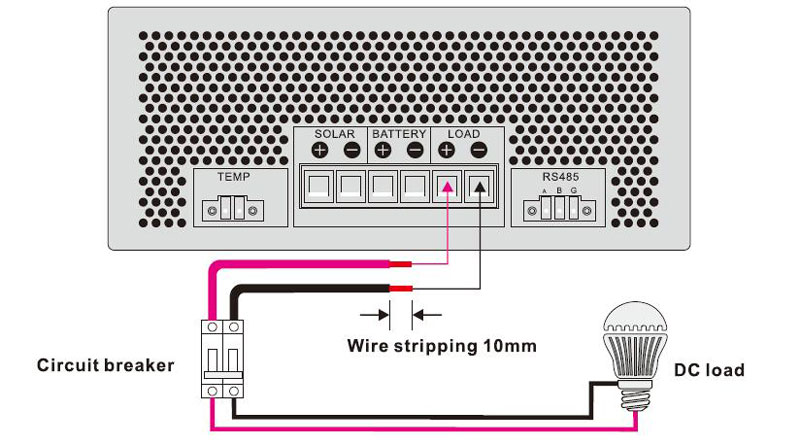
3. Connect DC load to MPPT charge controller
The "DC LOAD" terminal of the MPPT solar charge controller can be connected to a DC load that has the same rated voltage as the batteries. The charge controller will provide the power based on the voltage of the batteries. The wiring diagram of the MPPT solar charge controller and DC load is shown below.
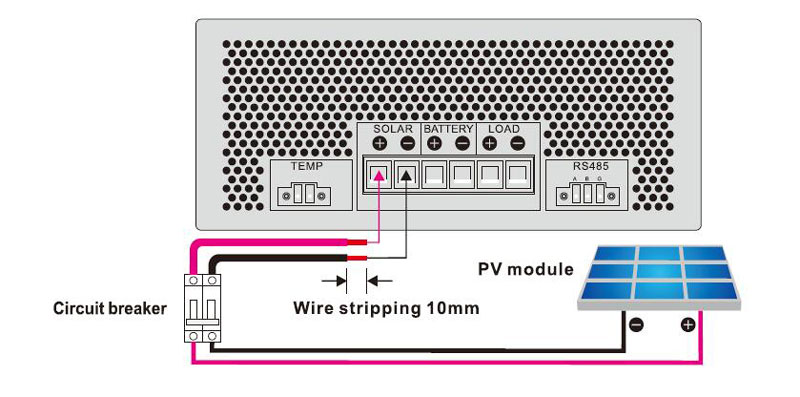
4. Connect PV panel module to MPPT charge controller
The MPPT solar charge controllers are suitable for 12V, 24V, 48V off-grid solar panel modules, and also for grid tie modules whose open voltage does not exceed the maximum input voltage specified. It is important to keep in mind that the PV module in the solar system must not be below the system voltage. The connection is shown in the following figure. Please note that the circuit breaker must be disconnected when connecting the PV module.
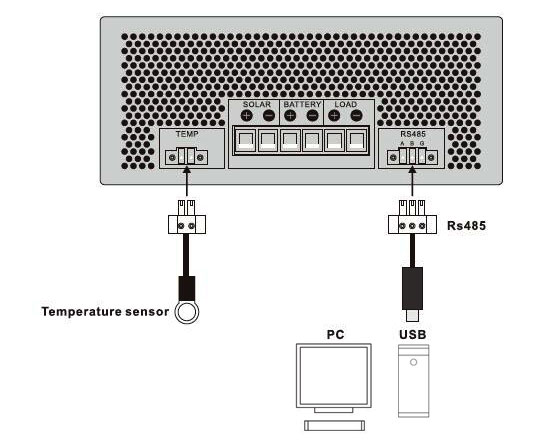
5. Temperature sensor, MPPT charge controller and PC connection
You can connect the MPPT solar charge controller to the temperature sensor and PC through the Rs485 communication line. The Rs485 communication line is optional and you can purchase an extra if you wish to do so.
Mppt Solar Charge Controller Installation
Installing an MPPT (Maximum Power Point Tracking) solar charge controller is a crucial step in setting up a solar power system. Here's a simple guide to help you with the installation:
Materials Needed:
- MPPT Solar Charge Controller
- Screwdriver
- Voltage Meter
- Wire Strippers
- Connectors and Wiring
- Solar Panels
- Battery Pack
Steps:
1.Choose a Suitable Location:
Select a location for the MPPT solar charge controller that is well-ventilated and protected from extreme temperatures. This will ensure optimal performance and longevity.
2.Mount the Controller:
Securely mount the MPPT controller on a flat surface using screws. Make sure the controller is easily accessible for monitoring and maintenance.
3.Connect the Solar Panels:
Connect the solar panels to the input terminals of the MPPT controller. Follow the manufacturer's instructions for proper wiring, typically positive to positive and negative to negative.
4.Connect the Battery:
Connect the battery pack to the output terminals of the MPPT controller. Again, observe the correct polarity to avoid any damage.
5.Connect Load (If Applicable):
If you have a load (appliances or devices), connect it to the load terminals of the MPPT controller. This allows the controller to regulate the power distribution.
6.Check Voltage Settings:
Use a voltage meter to check the voltage settings on the MPPT controller. Ensure that the settings match the specifications of your solar panels and battery.
7.Secure and Organize Wiring:
Securely fasten all wires to prevent any accidents or damage. Organize the wiring neatly to facilitate future inspections and maintenance.
8.Turn On the System:
Once everything is connected and secured, turn on the solar power system. Monitor the MPPT controller to ensure it's functioning correctly and efficiently tracking the maximum power point.
9.Monitor and Maintain:
Regularly monitor the MPPT controller's display for information on charging status and power output. Perform routine checks to ensure all connections are tight and secure.
By following these steps and the manufacturer's guidelines, you can successfully install an MPPT solar charge controller for an efficient and optimized solar power system. If you're unsure about any step, consult the user manual or seek professional assistance.
Buy low price yet high efficiency solar charge controller from
helios-ne.com, including 10 Amp, 20 Amp,...60 Amp PWM solar charge controllers and
20A,
30A to
60A MPPT solar charge controllers.
At Helios, our focus is on providing top-notch solar solutions, particularly in the realm of solar DC charge. Our extensive experience and commitment to excellence shine through, especially in the development of PWM (Pulse Width Modulation) and MPPT (Maximum Power Point Tracking) solar charge controllers. These controllers embody our unique concepts, offering reliable performance and efficiency.
Our solar controller products find wide applications in various settings, from solar standalone power systems to solar telecommunication power stations, solar RV power systems, and other power systems that require a solar DC charge source. Beyond solar charge controllers, our company has strong connections with products in other solar DC areas. This includes solar flexible panels/bags assembled with mono cells and Sun Power cells, lithium battery packs integrated with solar charge controllers, and all-in-one solar lights.

Comments