Understanding the markings on LED strips is crucial for proper connection. Low-voltage 12V or 24V switching is straightforward with monochrome LED strip lights.
Locate the markings on the LED strip, where you will see symbols such as +, –, GND, or Ground. These markings are always found at the cut-off points.
If the LED strip light features a standard 5.5 mm DC connector (barrel plug), the center of the connector is +, while the outer edge is -.
Installing 230V LED strip lights is straightforward; simply plug them into the wall! However, always remember to fully unwind the entire reel or roll before turning on the power. This prevents the tape from overheating and potentially getting damaged, even for a short duration. Connecting a standard LED strip light to the power supply is also easy. Just locate the connectors and make the connections.
If the LED strip light has a similar connector, simply plug them together (male-female). If the LED strip light has only two wires, you can connect it using either of these methods:
- Use a screw-in DC connector (male).
- Cut the LED driver connector and strip the wires. The wires will reveal the same colors as previously mentioned. Connect these wires to the strip using lever connectors, pigtail connectors, or wire nuts.
Finally, plug the LED driver into the wall, and the light should turn on.
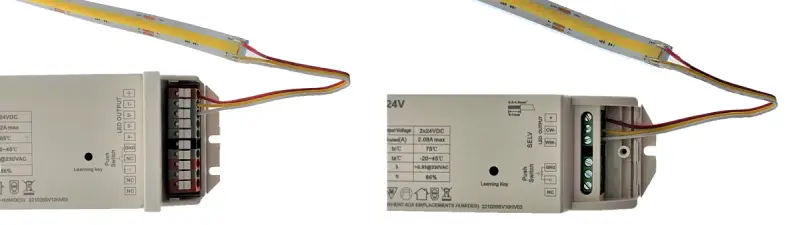
Connection to IP21 Transformer with Screw or Quick Connectors
The mains power is connected to the LED driver via a plug attached to the L and N terminals. To connect the tape, refer to the markings on the transformer head, which will indicate the + and – terminals. There are two types of connections you can use:
- Press down on the quick connector with your thumb or a screwdriver to open it, then push the wire into place. The wires will lock when you release the connector.
- Unscrew the connectors, insert the stripped wires, and tighten the screws.
To ensure the wires are securely in place, give them a gentle tug. Once confirmed, plug the device into the wall outlet, and the lights should turn on.
Connecting CCT LED to LED Driver
Most LED drivers come with either screw or quick connectors, ensuring consistency in mains connection instructions. However, when dealing with LED strips, particularly CCT (color temperature controlled) strips with three wires (+, warm (WW), and cold (CW)), there's a variation.
To connect the strip, consult the markings on the LED driver, usually denoting the +, WW, and CW terminals. Occasionally, WW and CW might be labeled as -1 and -2, respectively.
Correct wire placement is essential. If WW and CW are accidentally swapped, it's not a problem initially. However, adjusting the light to warm may result in it turning cold. In such cases, simply switch the positions of the WW and CW wires to resolve the issue.
After ensuring proper wire placement, double-check by gently tugging on the wires. Plug the device into the wall outlet, and the lights should illuminate.
Connecting to RGB+W LED Driver
These LED drivers also typically feature screw or quick connectors, maintaining consistency in the mains connection instructions. Therefore, when connecting them, the procedure remains unchanged. At this stage, the LED strip may have either 4 or 5 wires. Four wires indicate RGB, while five wires signify RGB+W, with a separate white light. Here are the most commonly used colors:
+ = black
R(ed) = red
G(reen) = green
B(read) = blue
W(hite) = white
To connect the tape, refer to the markings on the LED driver, which should indicate +, R, G, B, and W. Sometimes, they may be labeled as -1, -2, -3, and -4, respectively.
Ensuring correct wire placement is crucial. If the colors are mistakenly connected to the wrong terminals, such as red lighting up when it should be green, simply interchange the positions of the colored wires. This won't damage the tape.
After confirming proper wire placement, double-check by gently tugging on the wires. Plug the device into the wall outlet, and the lights should illuminate.
LED Driver + Control Unit (RGB or CCT)
In these scenarios, the driver is directly connected to the INPUT + and – terminals of the control device, while the LED strip light OUTPUT RGBW or CCT connects to their corresponding terminals.
IP65 LED Driver Connection with Only Wires
These drivers are designed for permanent installation and fall under electrical work regulations. They are clearly marked and must be adhered to for a safe installation process.
LED Strip Lighting Use and Maintenance
LED strip lighting is highly user-friendly and provides a diverse array of lighting options. Maintenance primarily entails cleaning the tape to remove dust and dirt. It's crucial to note that LED strip lighting should not be exposed to moisture unless it's explicitly designed for damp environments. Unless specified as a "wet LED strip," it's recommended to mount the LED strip on an aluminum profile.
LED Strip Light Installation Guides
Parallel Connection of LED Strip Lights – Exploring the principle of parallel connection with an illustrative example.
Cut-off for LED Strip Lights – Understanding the process of cutting and replacing LED strip lights. Troubleshooting Non-Lighting LED Strip Lights – Investigating the possible reasons why LED strip lights fail to illuminate.
Addressing Flashing LED Strip Lights – Analyzing the various causes behind LED strip lights flashing and providing solutions.
Factors Affecting LED Strip Light Lifetime – Examining the factors influencing the lifespan of LED strip lights and understanding longevity discrepancies.
Mounting LED Strip Lights – Guidelines for indoor and outdoor LED strip light mounting, including essential considerations.
RGB LED Strip Light Connection – Techniques for connecting RGB LED strip lights to different control devices.
Extending LED Strip Lights – A beginner's guide to soldering joints and extending LED strip lights.
Since 2009, Guangdong Suncom Power has been a leading authority in LED driver technology. With our in-house product design, our offerings boast cutting-edge technology. Backed by a warranty of up to 5 years, our products find extensive applications in industrial lighting, street lighting, plant lighting, smart lighting, and more.
LED Driver Products
Comments